Advertisement
Quick Links
Thank you for purchasing a Sealey product. Manufactured to a high standard, this product will, if used according to these
instructions, and properly maintained, give you years of trouble free performance.
IMPORTANT: PLEASE READ THESE INSTRUCTIONS CAREFULLY. NOTE THE SAFE OPERATIONAL REQUIREMENTS, WARNINGS & CAUTIONS. USE THE
PRODUCT CORRECTLY AND WITH CARE FOR THE PURPOSE FOR WHICH IT IS INTENDED. FAILURE TO DO SO MAY CAUSE DAMAGE AND/OR
PERSONAL INJURY AND WILL INVALIDATE THE WARRANTY. KEEP THESE INSTRUCTIONS SAFE FOR FUTURE USE.
1. SAFETY
WARNING! Ensure all Health & Safety, local authority and general workshop practice regulations are strictly adhered to when using
tools.
DO NOT use equipment if damaged.
Maintain the equipment in good and clean condition for best and safest performance.
If required, ensure vehicle to be worked on is adequately supported with axle stands, ramps and chocks.
Wear approved eye protection. A full range of personal safety equipment is available from your Sealey dealer.
Wear suitable clothing to avoid snagging. DO NOT wear jewellery and tie back long hair.
Account for all tools and equipment being used and DO NOT leave them in, on or near engine.
When not in use, place in protective case and store in a safe, dry, childproof area.
IMPORTANT: Always refer to the vehicle manufacturer's service instructions, or a proprietary manual, to establish the current procedure
and data. These instructions are provided as a guide only.
WARNING! The warnings, cautions and instructions referred to in this manual cannot cover all possible conditions and situations that
may occur. It must be understood that common sense and caution are factors which cannot be built into this product, but must be
applied by the operator.
2. INTRODUCTION
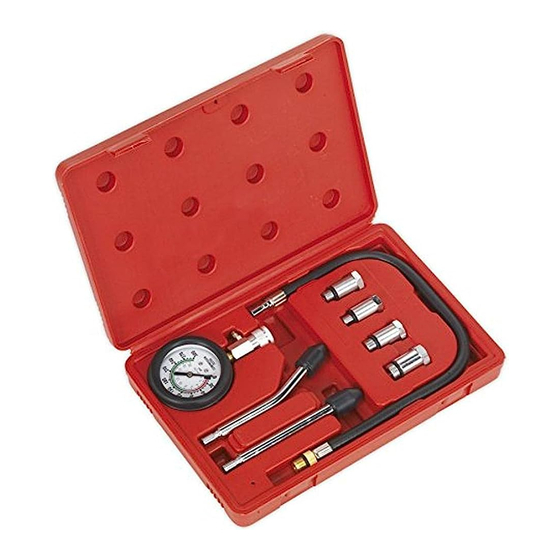
Compression tester fitted with a Ø63mm gauge reading up to 300psi and 20kg/cm². Kit includes 130mm straight and angled push on
connectors, 400mm flexible extension with 10, 12, 14 and 18mm adaptors. Supplied in carry-case.
3. OPERATION
RELEASE
VALVE
3.1.
Test Procedure
WARNING! Always release the pressure via the Release Valve before disconnecting the tester.
Press the release valve slowly to release the pressure gradually. Refer to Fig.1.
NOTE! A variation in compression readings between cylinders is often a better indication of engine problems than the absolute values
of compression.
3.2.
Run the engine until it reaches the normal operating temperature.
3.3.
Stop the engine and disconnect all spark plug wires, numbering them according to the cylinder to which they were connected.
3.4.
Loosen all spark plugs by about half a turn, but do not remove them.
3.5.
Using an air hose or wire brush, remove all the dirt and debris from the spark plug wells.
3.6.
Remove the spark plugs and place them on a clean, flat surface in the cylinder order in which they were removed.
3.7.
Remove the air filter and set the throttle plates to the wide open position, taking care not to damage the linkage or throttle components.
IMPORTANT: After test, failure to return the throttle plates to the closed position before starting the engine can cause serious
damage to the engine.
3.8.
Disconnect the ignition system, following the manufacturer's recommendations in the vehicle servicing manual.
3.9.
Select the spark plug adaptor required for the vehicle. Screw the adaptor to the hose. Screw the spark plug adaptor and hose assembly
into a spark plug well. Hand tighten only. DO NOT use a wrench. Refer to Fig.2.
3.10. Connect the coupling on the gauge to the hose. Ensure the coupling is fully engaged.
3.11. Crank the engine for at least five compression strokes, or until the pressure reading on the gauge stops rising.
3.12. Record the compression reading, then push the side release valve to relieve the pressure.
3.13. Repeat the test and record the reading. Relieve the pressure and remove the hose and adaptor from the spark plug well.
3.14. Repeat for the remainder of the cylinders.
3.15. You may also connect one of the Push On Connectors straight to the gauge coupling to aid quick installation. Select either the straight
or angled stem for easiest access.
© Jack Sealey Limited
INSTRUCTIONS FOR:
PETROL ENGINE COMPRESSION
TEST KIT 8PC
MODEL NO:
Fig.1
Original Language Version
CT955.V3
Fig.2
HAND
TIGHTEN
CT955.V3 Issue: 1 - 18/09/14
Advertisement

Summary of Contents for Sealey CT955 V3
- Page 1 CT955.V3 MODEL NO: Thank you for purchasing a Sealey product. Manufactured to a high standard, this product will, if used according to these instructions, and properly maintained, give you years of trouble free performance. IMPORTANT: PLEASE READ THESE INSTRUCTIONS CAREFULLY. NOTE THE SAFE OPERATIONAL REQUIREMENTS, WARNINGS & CAUTIONS. USE THE PRODUCT CORRECTLY AND WITH CARE FOR THE PURPOSE FOR WHICH IT IS INTENDED.
- Page 2 Parts support is available for this product. To obtain a parts listing and/or diagram, please log on to www.sealey.co.uk, email sales@sealey.co.uk or telephone 01284 757500. NOTE: It is our policy to continually improve products and as such we reserve the right to alter data, specifications and component parts without prior notice.


